注意本文使用的vue-cli是2.9.3
vue多页面配置调整方式
全局安装vue-cli
1 npm install vue-cli@2.9.3 -g
生成模板,我使用的模板是webpack
安装过程中的询问
是否安装vue-router(安装方便我们多页面里路由再次进行跳转)
是否安装eslint (这个配置比较繁琐这次不安装)
后面几个模块先不进行安装(这次的目标是多页面配置。。。。)
初始化后会有提示如何进行运行
1
2
3
4
# 依照我们的项目,你应该 cd xxx //切换到生成的模板目录 npm install //安装依赖 npm run dev //如果出现经典的vue logo说明你初始化成功
多页面的目录结构调整
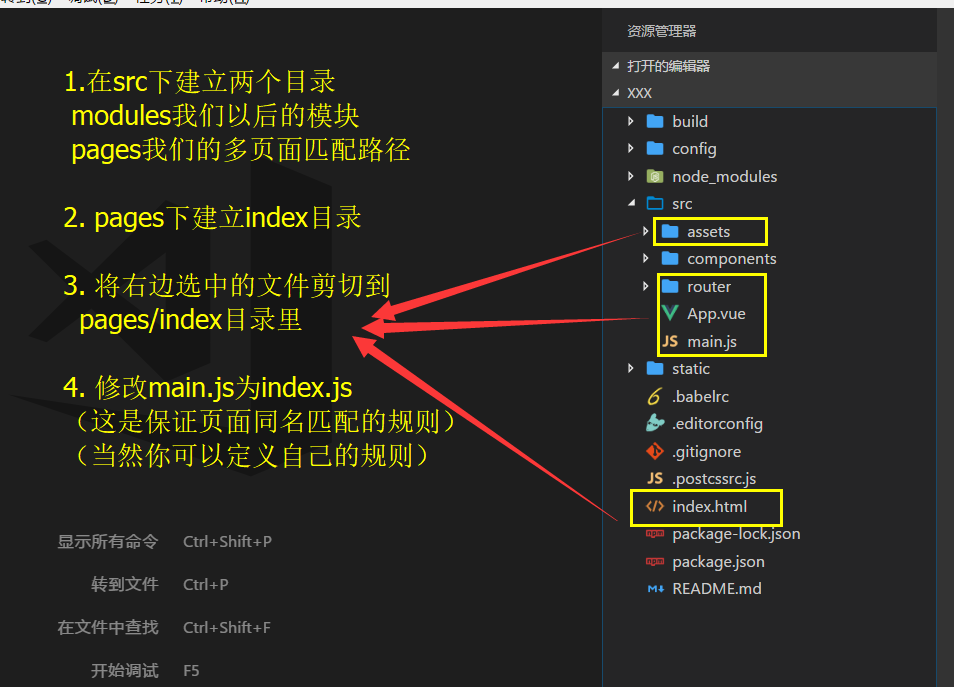
在开发路径src下增加modules和pages文件夹,分别存放模块和页面
页面的所有文件都放到同一文件夹下就近管理:
如上选中文件都移到index文件夹下,并把main.js改为index.js,保证页面的入口js文件和模板文件的名称一致1 2 3 4 index.html(页面模板) main.js(页面入口文件) App.vue(页面使用的组件,公用组件放到components文件夹下)router(页面的路由配置) assets(页面的静态资源)
添加共同方法
在build/utils.js中添加两个方法:webpack多入口文件和多页面输出
1 2 3 4 5 6 7 8 9 10 11 12 13 14 15 16 17 18 19 20 21 22 23 24 25 26 27 28 29 30 31 32 33 34 35 36 37 38 39 40 41 42 43 var glob = require('glob') var HtmlWebpackPlugin = require('html-webpack-plugin') var PAGE_PATH = path.resolve(__dirname, '../src/pages') var merge = require('webpack-merge') //多入口配置 exports.entries = function() { var entryFiles = glob.sync(PAGE_PATH + '/*/*.js') var map = {} entryFiles.forEach((filePath) => { var filename = filePath.substring(filePath.lastIndexOf('\/') + 1, filePath.lastIndexOf('.')) map[filename] = filePath }) return map } //多页面输出配置 exports.htmlPlugin = function() { let entryHtml = glob.sync(PAGE_PATH + '/*/*.html') let arr = [] entryHtml.forEach((filePath) => { let filename = filePath.substring(filePath.lastIndexOf('\/') + 1, filePath.lastIndexOf('.')) let conf = { template: filePath, filename: filename + '.html', chunks: [filename], inject: true } if (process.env.NODE_ENV === 'production') { conf = merge(conf, { chunks: ['manifest', 'vendor', filename], minify: { removeComments: true, collapseWhitespace: true, removeAttributeQuotes: true }, chunksSortMode: 'dependency' }) } arr.push(new HtmlWebpackPlugin(conf)) }) return arr }
修改配置
1) 修改build/webpack.base.conf.js的入口配置
1
2
3
4
5
// 替换默认的单页面入口 // entry: { // app: './src/main.js' // } entry: utils.entries()
2)修改build/webpack.dev.conf.js和build/webpack.prod.conf.js的多页面配置:
把原有的页面模板配置注释或删除,并把多页面配置添加到plugins
webpack.dev.conf.js:
1
2
3
4
5
6
7
8
9
plugins: [ ...... // new HtmlWebpackPlugin({ // filename: 'index.html', // template: 'index.html', // inject: true // }), ...... ].concat(utils.htmlPlugin())
webpack.prod.conf.js:
1
2
3
4
5
6
7
8
9
10
11
12
13
14
15
plugins: [ ...... // new HtmlWebpackPlugin({ // filename: config.build.index, // template: 'index.html', // inject: true, // minify: { // removeComments: true, // collapseWhitespace: true, // removeAttributeQuotes: true // }, // chunksSortMode: 'dependency' // }), ...... ].concat(utils.htmlPlugin())
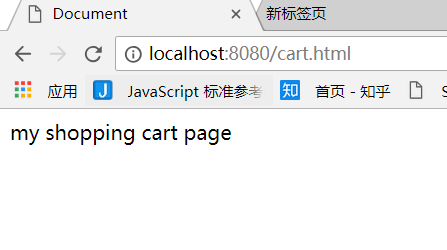
在pages目录里创建cart目录
终于你可以试试多页面是否成功了
补充说明
在上面多页面输出配置utils.js中有这样一行代码:
1 chunks: ['manifest', 'vendor', filename]
这是html-webpack-plugin 插件对页面入口文件(即js文件)的限定,如果不设置则会把整个项目下的所有入口文件全部引入
为什么要引入’manifest’和’vendor’
在build/webpack.prod.conf.js中有如下代码:
1
2
3
4
5
6
7
8
9
10
11
12
13
14
15
16
17
18
19
20
// split vendor js into its own file new webpack.optimize.CommonsChunkPlugin({ name: 'vendor', minChunks: function (module, count) { // any required modules inside node_modules are extracted to vendor return ( module.resource && /\.js$/.test(module.resource) && module.resource.indexOf( path.join(__dirname, '../node_modules') ) === 0 ) } }), // extract webpack runtime and module manifest to its own file in order to // prevent vendor hash from being updated whenever app bundle is updated new webpack.optimize.CommonsChunkPlugin({ name: 'manifest', chunks: ['vendor'] }),
vendor模块是指提取涉及node_modules中的公共模块
manifest模块是对vendor模块做的缓存
关于CommonsChunkPlugin插件的详细说明请阅读官方文档
关于html-webpack-plugin插件的配置还有一行代码:
1 chunksSortMode: 'dependency'
插件会按照模块的依赖关系依次加载,即:manifest,vendor,本页面入口,其他页面入口…
至此,多页面应用已经搭建完毕,只需要在pages文件夹创建相应的页面文件即可。