光栅化填充三角形算法TriangleRasterization
简介 triangle 光栅化算法
本文讨论三角形光栅化算法,也就是三角形的填充算法,在平时的开发中其实该算法很少会遇到,目前的光栅化其实都是已经固化到了显卡芯片里,
但是里面的很多思路我们还是可以借鉴的,比如扫描线算法在gis,计算几何的应用中很广泛。
I. 标准三角形光栅化算法
标准算法主要主要考虑了底部平行x轴和顶部平行x轴这两种情况,事实上大家都知道这两种情况很好绘制。
如下图所示
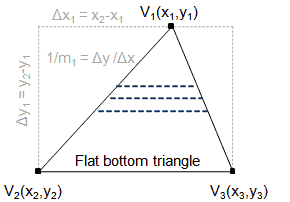
如左图所示我们从点v1开始平行于底部边v2v3开始绘制一条一条的平行线。他们的交点分别为p1 ,p2。
显而易见,p1.y = p2.y,他们的y值是一样的。
同时v1.y1 - p1.y = v1.y - p2.y。 这个算法的主要流程就是从点v1 开始,沿着边v2v3一步一步的绘制直线填充这个三角形。
从点v1开始每一次一条线都是向下扫描前进的单位是dy = 1。两条腿的斜率为 slope = dy/dx ,dx = dy/slope;
这个的算法思想如下:
1. 计算边 v1v2,v1v3斜率的倒数invslope1 , invslope2
2. 然后从v1.y 开始不断的 vec2 p1 = v1 + vec2(invslope1,1) vec2 p2 = v1 + vec2(invslope2,1)(这里偷懒用向量表示下)一步一步的前进构建直线
1 | // 采用笛卡尔坐标系,下为正y,右为正x |
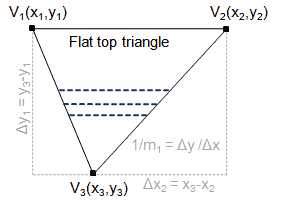
然后考虑后面一种情况
同理绘制下面这个三角形。只不过,开始的点不一样,1
2
3
4
5
6
7
8
9
10
11
12
13
14
15
16
17
18// 采用笛卡尔坐标系,下为正y,右为正x
fillTopFlatTriangle(Vertice v1, Vertice v2, Vertice v3)
{
float invslope1 = (v3.x - v1.x) / (v3.y - v1.y);
float invslope2 = (v3.x - v2.x) / (v3.y - v2.y);
float curx1 = v3.x;
float curx2 = v3.x;
for (int scanlineY = v3.y; scanlineY > v1.y; scanlineY--)
{
drawLine((int)curx1, scanlineY, (int)curx2, scanlineY);
// 勘误 假设左边的点x为curx1,那么curx1 -= invslope1 原文为 +=
// 可能坐标系不一样
curx1 -= invslope1;
curx2 -= invslope2;
}
}
有了前面的基础,现在我们考虑一下如下图所示的更加一般的情况,基本思路就是将该三角形分解为和上面类型一样的两个三角形
一个平顶的一个平底的。这样我们就能将一个新问题转化为已经解决了的问题了。现在问题的关键点就是我们如何使用切分这个一般的三角形,如下图所示。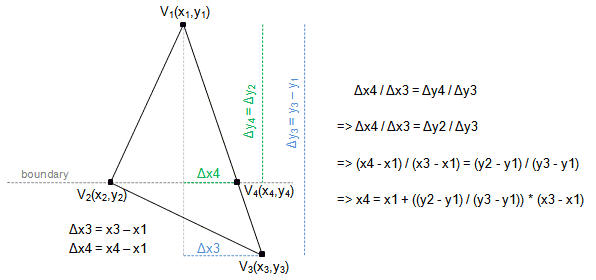
现在我们穿过点v2 沿着x轴构建一条直线。假设这条直线与三角形的交点为v4,并且v4.y = v2.y。至于v4.x 我们可以使用截线定理(Intercept theorem)获得。
具体的推导过程上图的右边已经给出了,最终我们获得了两个三角形Δ1 = (V1, V2, V4) , Δ2 = (V2, V4, V3),分割成这两个三角形之后,我们就能使用上面的两种特殊情况来拼凑成一般情况下的三角形光栅化算法了,稳!!
一下为具体的三角形绘制算法1
2
3
4
5
6
7
8
9
10
11
12
13
14
15
16
17
18
19
20
21
22
23
24
25
26
27
28
29
30
31
32// 采用笛卡尔坐标系,下为正y,右为正x
drawTriangle()
{
/* at first sort the three vertices by y-coordinate ascending so v1 is the topmost vertice */
/* 第一步将三个点按照y值大小进行排序,确定顶部的第一个点 */
sortVerticesAscendingByY();
/* here we know that v1.y <= v2.y <= v3.y */
/* 这里默认的是 v1.y <= v2.y <= v3.y */
/* check for trivial case of bottom-flat triangle */
/* 这种情况下是一个底部平行于x轴的三角形 */
if (v2.y == v3.y)
{
fillBottomFlatTriangle(v1, v2, v3);
}
/* check for trivial case of top-flat triangle */
/* 这种情况下是一个顶部平行于x轴的三角形 */
else if (vt1.y == vt2.y)
{
fillTopFlatTriangle(g, vt1, vt2, vt3);
}
else
{
/* general case - split the triangle in a topflat and bottom-flat one */
/* 一般情况下算法 */
/* 这里默认的是 v1.y <= v2.y <= v3.y */
/* 所以 第二个点是v2 但是在实际的应用中我们这个需要先对整个点进行排序 */
Vertice v4 = new Vertice( (int)(vt1.x + ((float)(vt2.y - vt1.y) / (float)(vt3.y - vt1.y)) * (vt3.x - vt1.x)), vt2.y);
fillBottomFlatTriangle(g, vt1, vt2, v4);
fillTopFlatTriangle(g, vt2, v4, vt3);
}
}
II. Bresenham 三角形光栅化算法
首先假定大家都知道Bresenham 直线算法,假如你不知道的话,请看另外一篇介绍Bresenham算法的文章。
上面介绍了三角形光栅化的核心标准算法,但是这里会遇到一个问题。光栅化的算法是将直线绘制到屏幕上,但是因为屏幕是一个一个离散独立的点,所以在光栅化的算法中点坐标各个分量的值都应该是整数。
但是上面的算法在考虑三角形边界的时候没有考虑这个问题。所以有了 Bresenham 三角形光栅化算法。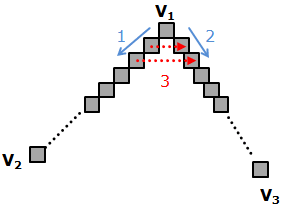
1 | 这一段因为涉及到bresenham细节问题,暂时先不翻译,后续理解bresenham算法后再翻译 |
显然,我们是在y轴方向一步步的扫描线段,bresenham算法提前为我们提供了线v1v2上点的y值。同样的我们也能使用bresenham算法为我们计算v1v3的点。
现在我们分别获取了v1v2和线v1v3获取了两个点,这些点他们的他们y值是一样的。现在我们只需要取绘制水平线即可。
整个算法的意思大约:就是我们先使用 bresenham 分别绘制v1v2,v1v3,绘制边的同时,通过获取的点,绘制两个点之间的水平线。
当然了个人理解上面是一种实现,也可以先用bresenham绘制出边的信息,然后再结合这些边信息,采用标准光栅化算法去填充三角形。
具体的实现如下所示:
- 使用bresenham算法绘制v1v2一个点p1
- 使用bresenham算法绘制v1v2一个点p2,其中p1.y = p2.y
- 利用 p1,p2 使用上面的标准算法(也就是大名鼎鼎的扫描线算法)绘制p1,p2 之间的水平线。
- 重复上面的过程,直到完成整个三角形的光栅化
III. Barycentric 三角形光栅化算法
Barycentric 三角形光栅化算法,我们基于前面介绍的知识。通过Barycentric 算法判断点是否在三角形内。
主要思想如下:
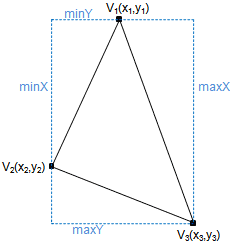
首先确定三角形的包围盒,然后测试包围盒每个点是否在三角形内,如果是,就绘制这个点,非常简单。
与上面的那些算法不同的是,这个算法不需要先对点进行排序。
以下算法用来去定三角形的包围盒
1
2
3
4
5
/* get the bounding box of the triangle */
int maxX = Math.max(v1.x, Math.max(v2.x, v3.x));
int minX = Math.min(v1.x, Math.min(v2.x, v3.x));
int maxY = Math.max(v1.y, Math.max(v2.y, v3.y));
int minY = Math.min(v1.y, Math.min(v2.y, v3.y));
最后使用两个嵌套循环,迭代包围盒的每一个点,如果点在三角形内就绘制这个点。
至于如何判断一个点是否在三角形内 1
2
3
4
5
6
7
8
9
10
11
12
13
14
15
16
17
18
19
20
21
22/* spanning vectors of edge (v1,v2) and (v1,v3) */
/* 使用点生成两个边(v1,v2)(v1,v3) 的向量 */
Vertice vs1 = new Vertice(vt2.x - vt1.x, vt2.y - vt1.y);
Vertice vs2 = new Vertice(vt3.x - vt1.x, vt3.y - vt1.y);
for (int x = minX; x <= maxX; x++)
{
for (int y = minY; y <= maxY; y++)
{
// 以下内容需要看 另外一篇文章
Vertice q = new Vertice(x - vt1.x, y - vt1.y);
float s = (float)crossProduct(q, vs2) / crossProduct(vs1, vs2);
float t = (float)crossProduct(vs1, q) / crossProduct(vs1, vs2);
if ( (s >= 0) && (t >= 0) && (s + t <= 1))
{ /* inside triangle */
drawPixel(x, y);
}
}
}
引用
[1] Bresenham Algorithm Article
[2] Point in Triangle Algorithms Article
本文主要翻译自Sunshine 的TriangleRasterization
原文作者: Chaos
许可协议: 知识共享署名-非商业性使用 4.0 国际许可协议